Hibernate içerisinde ilişkileri belirtmek için bire – çok , çoka – bir , çoka – çok gibi durumlar vardır.Bu durumları anotasyonlar yardımıyla kolay bir şekilde entegre edebiliyoruz.Bu yazımda OneToOne anotasyonunu inceleyeceğiz.One to one yani bire bir ilişki olduğunu bize belirtiyor.Bir öğrenci düşünelim.Bu öğrencinin sadece bir adresi olabileceğini varsayalım.Aynı şekilde bir adreste sadece bir öğrenci oturacağı durumda One to one ilişkisini kullanıyoruz.Bu anotasyon sayesinde bir öğrenci sadece bir adet adres değeri alabiliyor.Diğer bir durumda bir adresi sadece bir öğrenciye karşılık geliyor.Proje üzerinde değinmeye çalışalım.
1)Maven projesi oluşturalım ve pom.xml dosyamız içerisine bağımlılıklarımızı ekleyelim.
[code lang=”xml”]
<project xmlns="http://maven.apache.org/POM/4.0.0" xmlns:xsi="http://www.w3.org/2001/XMLSchema-instance" xsi:schemaLocation="http://maven.apache.org/POM/4.0.0 http://maven.apache.org/xsd/maven-4.0.0.xsd">
<modelVersion>4.0.0</modelVersion>
<groupId>0007-Blog-com.enesbyc.OneToOne</groupId>
<artifactId>0007-Blog-com.enesbyc.OneToOne</artifactId>
<version>0.0.1-SNAPSHOT</version>
<dependencies>
<dependency>
<groupId>junit</groupId>
<artifactId>junit</artifactId>
<version>3.8.1</version>
<scope>test</scope>
</dependency>
<dependency>
<groupId>org.hibernate</groupId>
<artifactId>hibernate-core</artifactId>
<version>4.3.5.Final</version>
</dependency>
<dependency>
<groupId>mysql</groupId>
<artifactId>mysql-connector-java</artifactId>
<version>5.1.6</version>
</dependency>
</dependencies>
<build>
<sourceDirectory>src</sourceDirectory>
<resources>
<resource>
<directory>src</directory>
<excludes>
<exclude>**/*.java</exclude>
</excludes>
</resource>
</resources>
<plugins>
<plugin>
<artifactId>maven-compiler-plugin</artifactId>
<version>3.5.1</version>
<configuration>
<source>1.7</source>
<target>1.7</target>
</configuration>
</plugin>
</plugins>
</build>
</project>
[/code]
2)Projemize tekrar sağ tıklayarak File -> New -> Other -> XML File adımlarını izleyelim.XML seçip hibernate.cfg.xml dosyamızı projemize ekleyelim.Burada isim önemli farklı bir isimde açarsak proje bu xml dosyasını görmeyecektir ve hibernate configrasyon yapılamayacaktır.Hibernate dosyamız içerisinde veritabanı bağlantı bilgilerinde veritabanı adı , bağlanacağımız kullanıcı adı ve şifre alanlarını kendi veritabanımıza göre dolduralım.
[code lang=”xml”]
<?xml version=’1.0′ encoding=’utf-8′?>
<!DOCTYPE hibernate-configuration PUBLIC "-//Hibernate/Hibernate Configuration DTD 3.0//EN" "http://www.hibernate.org/dtd/hibernate-configuration-3.0.dtd">
<hibernate-configuration>
<session-factory>
<!– Database connection settings –>
<property name="connection.driver_class">com.mysql.jdbc.Driver</property>
<property name="connection.url">jdbc:mysql://localhost:3306/deneme</property>
<property name="connection.username">root</property>
<property name="connection.password"></property>
<!– JDBC connection pool (use the built-in) –>
<property name="connection.pool_size">1</property>
<!– SQL dialect –>
<property name="dialect">org.hibernate.dialect.MySQLDialect</property>
<!– Disable the second-level cache –>
<property name="cache.provider_class">org.hibernate.cache.internal.NoCacheProvider</property>
<!– Echo all executed SQL to stdout Sql kodlarını consolda gösterir.–>
<property name="show_sql">true</property>
<!– Drop and re-create the database schema on startup Eğer önceden böyle bir tablo varsa silip yeni oluşturur. –>
<property name="hbm2ddl.auto">create</property>
<mapping class="com.enesbyc.Student"/>
<mapping class="com.enesbyc.Address"/>
</session-factory>
</hibernate-configuration>
[/code]
3) com.enesbyc paketi oluşturalım ve içerisinde Address sınıfımızı oluşturalım.Adres sınıfımız içerisine alanlarımızı doldurup set ve get metotlarımızı tanımlayalım.
[code lang=”java”]
package com.enesbyc;
import javax.persistence.Column;
import javax.persistence.Entity;
import javax.persistence.GeneratedValue;
import javax.persistence.GenerationType;
import javax.persistence.Id;
@Entity
public class Address {
@Id
@GeneratedValue(strategy = GenerationType.AUTO)
private int addressID;
@Column(name = "street")
private String Street;
@Column(name = "country")
private String Country;
public String getStreet() {
return Street;
}
public void setStreet(String street) {
Street = street;
}
public String getCountry() {
return Country;
}
public void setCountry(String country) {
Country = country;
}
public int getAddressID() {
return addressID;
}
public void setAddressID(int addressID) {
this.addressID = addressID;
}
}
[/code]
4)com.enesbyc paketi içerisinde Student sınıfımızı oluşturalım.Bu sınıf içerisinde veritabanımızda haritalanması için Entity anotasyonunu sınıfımızın üst kısmına yazalım. Sınıfımız içerisinde Address tipinde bir property oluşturalım.OnetoOne anotasyonunu adres alanımızın üzerine bırakmamız gerekiyor.Bu sayede bire – bir ilişkisini gerçekleştirmiş oluyoruz.Ardından JoinColumn anotasyonu ile Student tablosuna eklenecek kolonun adını yazıyoruz.Bu adımdan sonra Student sınıfımız içerisinde addressID kolonumuz oluşturulacaktır.
[code lang=”java”]
package com.enesbyc;
import javax.persistence.Column;
import javax.persistence.Entity;
import javax.persistence.GeneratedValue;
import javax.persistence.GenerationType;
import javax.persistence.Id;
import javax.persistence.JoinColumn;
import javax.persistence.OneToOne;
@Entity
public class Student {
@Id
@GeneratedValue(strategy = GenerationType.AUTO)
@Column(name = "Student_ID")
private int studentID;
@Column(name = "Student_Name")
private String name;
@Column(name = "Student_Surname")
private String surname;
@OneToOne//Bir ögrencinin bir tane adresi oldugunu belirtiyoruz.
@JoinColumn(name="addressID")//Student tablosuna eklenecek kolonun adi
private Address address;
public int getStudentID() {
return studentID;
}
public void setStudentID(int studentID) {
this.studentID = studentID;
}
public String getName() {
return name;
}
public Address getAddress() {
return address;
}
public void setAddress(Address address) {
this.address = address;
}
public void setName(String name) {
this.name = name;
}
public String getSurname() {
return surname;
}
public void setSurname(String surname) {
this.surname = surname;
}
}
[/code]
5)Test sınıfımızı oluşturalım ve içerisinde tabloya veri ekleyelim.
[code lang=”java”]
package com.enesbyc.test;
import org.hibernate.Session;
import org.hibernate.SessionFactory;
import org.hibernate.cfg.Configuration;
import com.enesbyc.Address;
import com.enesbyc.Student;
public class Test {
@SuppressWarnings({ "deprecation"})
public static void main(String[] args) {
//Adres olusturuyoruz.
Address address=new Address();
address.setStreet("Street 1");
address.setCountry("Country 1");
//Ögrenci olusturuyoruz.
Student student=new Student();
student.setName("Enes");
student.setSurname("Boyacý");
student.setAddress(address);
SessionFactory sessionFactory=new Configuration().configure().buildSessionFactory();
Session session=sessionFactory.openSession();
session.beginTransaction();
//Olusturdugumuz ögrenciyi ve adresi veritabanina kaydedelim.
session.save(address);
session.save(student);
session.getTransaction().commit();
}
}
[/code]
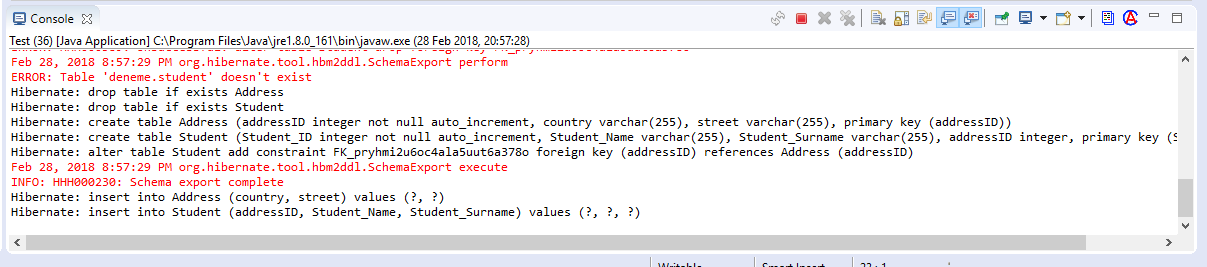
6)Projemizi çalıştıralım ve konsol üzerinden çıktımızı kontrol edelim.Çıktımızdada gördüğümüz gibi veritabanı içerisinde Student tablosu oluşturuldu.Ayrıca Student tablomuz içerisine addressID kolonu eklenerek hangi adreste olduğuna ulaşabiliyoruz.
Bir sonraki yazımda görüşmek üzere…