Hibernate içerisinde ilişkileri belirtmek için bire – çok , çoka – bir , çoka – çok gibi durumlar vardır.Bu durumları anotasyonlar yardımıyla kolay bir şekilde entegre edebiliyoruz.Bu yazımda OneToMany anotasyonunu inceleyeceğiz.One to many yani bire – çok ilişki olduğu anlamına gelmektedir.Örnek üzerinden yola çıkmak gerekirse bir müşterinin birden fazla sipariş verebilme durumunu düşünelim.Bir müşteri birden fazla sipariş verebileceği için bire-çok ilişki karşımıza çıkıyor.Kullanacağımız anotasyon ise OneToMany anotasyonu olacaktır.Proje üzerinden daha ayrıntılı biçimde anlatmaya çalışalım.
1)Maven projesi oluşturalım ve pom.xml dosyamız içerisine bağımlılıklarımızı ekleyelim.
[code lang=”xml”]
<project xmlns="http://maven.apache.org/POM/4.0.0" xmlns:xsi="http://www.w3.org/2001/XMLSchema-instance" xsi:schemaLocation="http://maven.apache.org/POM/4.0.0 http://maven.apache.org/xsd/maven-4.0.0.xsd">
<modelVersion>4.0.0</modelVersion>
<groupId>0008-Blog-com.enesbyc.OneToMany</groupId>
<artifactId>0008-Blog-com.enesbyc.OneToMany</artifactId>
<version>0.0.1-SNAPSHOT</version>
<dependencies>
<dependency>
<groupId>junit</groupId>
<artifactId>junit</artifactId>
<version>3.8.1</version>
<scope>test</scope>
</dependency>
<dependency>
<groupId>org.hibernate</groupId>
<artifactId>hibernate-core</artifactId>
<version>4.3.5.Final</version>
</dependency>
<dependency>
<groupId>mysql</groupId>
<artifactId>mysql-connector-java</artifactId>
<version>5.1.6</version>
</dependency>
</dependencies>
<build>
<sourceDirectory>src</sourceDirectory>
<resources>
<resource>
<directory>src</directory>
<excludes>
<exclude>**/*.java</exclude>
</excludes>
</resource>
</resources>
<plugins>
<plugin>
<artifactId>maven-compiler-plugin</artifactId>
<version>3.5.1</version>
<configuration>
<source>1.7</source>
<target>1.7</target>
</configuration>
</plugin>
</plugins>
</build>
</project>
[/code]
2)Projemize tekrar sağ tıklayarak File -> New -> Other -> XML File adımlarını izleyelim.XML seçip hibernate.cfg.xml dosyamızı projemize ekleyelim.Burada isim önemli farklı bir isimde açarsak proje bu xml dosyasını görmeyecektir ve hibernate configrasyon yapılamayacaktır.Hibernate dosyamız içerisinde veritabanı bağlantı bilgilerinde veritabanı adı , bağlanacağımız kullanıcı adı ve şifre alanlarını kendi veritabanımıza göre dolduralım.
[code lang=”xml”]
<?xml version=’1.0′ encoding=’utf-8′?>
<!DOCTYPE hibernate-configuration PUBLIC "-//Hibernate/Hibernate Configuration DTD 3.0//EN" "http://www.hibernate.org/dtd/hibernate-configuration-3.0.dtd">
<hibernate-configuration>
<session-factory>
<!– Database connection settings –>
<property name="connection.driver_class">com.mysql.jdbc.Driver</property>
<property name="connection.url">jdbc:mysql://localhost:3306/deneme</property>
<property name="connection.username">root</property>
<property name="connection.password"></property>
<!– JDBC connection pool (use the built-in) –>
<property name="connection.pool_size">1</property>
<!– SQL dialect –>
<property name="dialect">org.hibernate.dialect.MySQLDialect</property>
<!– Disable the second-level cache –>
<property name="cache.provider_class">org.hibernate.cache.internal.NoCacheProvider</property>
<!– Echo all executed SQL to stdout Sql kodlarını consolda gösterir.–>
<property name="show_sql">true</property>
<!– Drop and re-create the database schema on startup Eğer önceden böyle bir tablo varsa silip yeni oluşturur. –>
<property name="hbm2ddl.auto">create</property>
<mapping class="com.enesbyc.Customer"/>
<mapping class="com.enesbyc.Order"/>
</session-factory>
</hibernate-configuration>
[/code]
3) com.enesbyc paketi oluşturalım ve içerisinde Order sınıfımızı oluşturalım.Order sınıfımız içerisine alanlarımızı doldurup set ve get metotlarımızı tanımlayalım.
[code lang=”java”]
package com.enesbyc;
import javax.persistence.Entity;
import javax.persistence.GeneratedValue;
import javax.persistence.GenerationType;
import javax.persistence.Id;
import javax.persistence.Table;
@Entity
@Table(name="Order_Table")
public class Order {
@Id
@GeneratedValue(strategy=GenerationType.AUTO)
private int orderID;
private String orderName;
private int price;
public int getOrderID() {
return orderID;
}
public void setOrderID(int orderID) {
this.orderID = orderID;
}
public String getOrderName() {
return orderName;
}
public void setOrderName(String orderName) {
this.orderName = orderName;
}
public int getPrice() {
return price;
}
public void setPrice(int price) {
this.price = price;
}
}
[/code]
4)com.enesbyc paketi içerisinde Customer sınıfımızı oluşturalım.Bu sınıf içerisinde veritabanımızda haritalanması için Entity anotasyonunu sınıfımızın üst kısmına yazalım. Sınıfımız içerisinde Order tipinde bir property oluşturalım.Kurgumuzda bire çok ilişki olduğunu söylemiştik.Yani bir müşteri birden fazla sipariş verebilecekti.Bunu yapabilmek için Collection , list gibi yapıları kullanıyoruz.Collection tipinde bir order oluşturalım.Oluşturduğumuz Collection sayesinde bir müşteri için birden fazla sipariş olabileceği durumunu ele almış oluyoruz.Ayrıca OneToMany anotasyonunuda belirtmemiz gerekiyor.
[code lang=”java”]
package com.enesbyc;
import java.util.ArrayList;
import java.util.Collection;
import javax.persistence.Entity;
import javax.persistence.GeneratedValue;
import javax.persistence.GenerationType;
import javax.persistence.Id;
import javax.persistence.JoinColumn;
import javax.persistence.OneToMany;
@Entity
public class Customer {
@Id
@GeneratedValue(strategy = GenerationType.AUTO)
private int customerID;
private String firstName;
private String lastName;
private String email;
@OneToMany
// Bire çok iliski oldugunu belirtiyoruz.
// Burada Order tipinde Liste olusturuyoruz.
// Bunun nedeni bir kullanici birden fazla siparis olusturabilecesi için
// siparisleri liste seklinde tutuyoruz.
@JoinColumn(name = "customerID")
// Order tablosuna eklenecek kolonun adini yaziyoruz
private Collection<Order> order = new ArrayList<Order>();
public int getCustomerID() {
return customerID;
}
public void setCustomerID(int customerID) {
this.customerID = customerID;
}
public String getFirstName() {
return firstName;
}
public void setFirstName(String firstName) {
this.firstName = firstName;
}
public String getLastName() {
return lastName;
}
public void setLastName(String lastName) {
this.lastName = lastName;
}
public String getEmail() {
return email;
}
public void setEmail(String email) {
this.email = email;
}
public Collection<Order> getOrder() {
return order;
}
public void setOrder(Collection<Order> order) {
this.order = order;
}
}
[/code]
5)Test sınıfımızı oluşturalım ve içerisini düzenleyelim.
[code lang=”java”]
package com.enesbyc.test;
import java.util.ArrayList;
import java.util.Collection;
import org.hibernate.Session;
import org.hibernate.SessionFactory;
import org.hibernate.cfg.Configuration;
import com.enesbyc.Customer;
import com.enesbyc.Order;
public class Test {
@SuppressWarnings({ "deprecation" })
public static void main(String[] args) {
// Siparis olusturuyoruz.
Order order = new Order();
order.setOrderName("Order1");
order.setPrice(40);
Order order2 = new Order();
order2.setOrderName("Order2");
order2.setPrice(13);
// Olusturulan siparisleri liste’ye atiyoruz.
// Listeye atmamizin nedeni bir kullanici birden fazla siparis
// verebilecegi için
// siparisleri liste içerisinde tutuyoruz.
Collection<Order> orderList = new ArrayList<Order>();
orderList.add(order);
orderList.add(order2);
// Kullanici olusturuyoruz.
Customer customer = new Customer();
customer.setFirstName("Enes");
customer.setLastName("Boyaci");
customer.setEmail("enesbyc19@gmail.com");
// Siparislerin oldugu listeyi kullanicinin siparislerine ekliyoruz.
customer.setOrder(orderList);
SessionFactory sessionFactory = new Configuration().configure()
.buildSessionFactory();
Session session = sessionFactory.openSession();
session.beginTransaction();
// Olusturdugumuz siparisi ve kullaniciyi veritabanina kaydedelim.
session.save(order);
session.save(order2);
session.save(customer);
session.getTransaction().commit();
}
}
[/code]
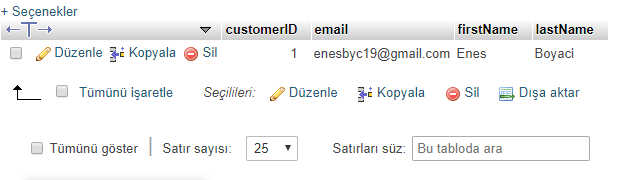
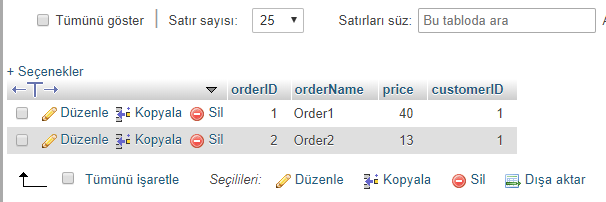
5)Projemizi çalıştıralım ve konsol üzerinden çıktımızı kontrol edelim.Çıktımızdada gördüğümüz gibi bir kullanıcı birden fazla sipariş verebiliyor.Fakat aynı sipariş birden fazla kullanıcıya ait olma durumunu OneToMany anotasyonumuz karşılayamıyor.Bu durumu ManyToMany anotasyonu içerisinde göreceğiz.
Bir sonraki yazımda görüşmek üzere…